

How To Create A 3d Logo In Blender
(This tutorial is also available in German and Italian)
About Blender
Blender is the open source software for 3D modeling, animation, rendering, post-production, interactive creation and playback. Available for all major operating systems under the GNU Public License.
You can download Blender free of charge on www.blender.org. On the Blender site you will also find a gallery with cool Blender art.
Introduction
Well, this time things aren't going to be as exciting as the ride in the mines, but I'm sure I can show you all some very useful Blender techniques.
This kind of stuff is actually the kind of work that pays computeranimators. While not being very sophisticated, this may be important to remember ;-)
The techniques that you will learn in this tutorial include:
- Rotoscoping (tracing a background image)
- Working with curves
Tracing your logo
Note before you begin: unfortunately as of Blender 2.37 the Background Image that is used below is broken. To do this tutorial you'll need to grab a copy of Blender 2.37 from the Blender Release Archive.
The most tedious part of creating a logo animation is tracing the logo. In most cases all you'll get as a freelancer is a paper print, or a bitmap of a companies' logo.
In this case, I just ripped a cool looking logo from the internet.

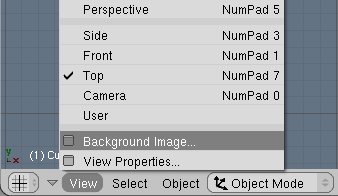
Fire up Blender and remove the plane from the middle of the screen. Select 'Background Image..' from the View menu:
Press the 'Use Background Image' and select the Open Folder icon next to 'Image'.
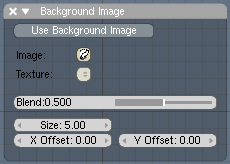
Select a file, and load your logo into Blender. When you're done (hit enter to load the image) you'll see the background picture in your viewport.
Next, add a curve (a Bezier curve is fine). While still in edit mode, go to the editbuttons screen and select the 'Convert to Poly' button. I always find it easier to create a general outline of a logo in straight lines first. Later, I'll convert everything back to smooth curves - don't worry!
Now, move the vertices to strategic locations on the logo. Keep drawing by holding down the control key and left-clicking your mouse. This will add new vertices and connect them to the existing curve.Make closed shaped by hitting the 'c' button. When you need new vertices for a new shape, duplicate an existing vertex (shift-D), and move it to another position.Don't worry too much about being very precise yet.
The picture above is the result after tracing only the numbers. For a bit of detail, look at the following picture, and pay attention to the way I drew the corners. This is important, because later on, I'll convert the polygons back into Bezier curves and the corners will be perfect this way.
Keep drawing, and don't worry about overlapping lines. Here's the result of tracing the entire image:
Yes - chaos. But I'll change that now! Select all vertices and convert them back into bezier curves. Now comes the real trick: for vertices along smooth parts of the logo (like the circles on the left), select the vertex, and hit h-key. This will align the bezier handles and create a smooth curve at that point.This is also the time to pay attention to positioning the vertices more precisely. In this case, the logo was scanned at a pretty low resolution, you you'll probably need to do a lot of quessing about the correct positions.Here's an example of a part of the '3':
I'm afraid that for the rest, it's just a lot of work, but in the end you should have a pretty good looking trace of your original bitmap. Also, keep the final purpose of your model in mind. For some low-resolution web designs, you probably don't have to worry too much about being very accurate!
The fun part
This is, or course, the better part of this tutorial ;-)
I'll just assume that we have what I like to call a 'default' customer. That is: a customer who wants a shiny, metallic looking logo. Oh well. Let do that!
First, give the object some depth. Leave editmode, go to the editbuttons screen, and set the following values:

How To Create A 3d Logo In Blender
Source: https://www.blendernation.com/tutorials/blender-3d-beginner-tutorial-creating-a-logo/
Posted by: lopezdresse.blogspot.com
0 Response to "How To Create A 3d Logo In Blender"
Post a Comment